The Roof
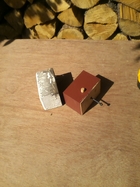
So what have I been doing these past 14 months? Well, to begin with, my "rose colored glasses" quickly cleared after my wife and I closed on the house, illuminating the multiple tasks before us. After this initial tsunami of reality poured over us, we began to prioritize what needed to be done. October was upon us with winter following close behind, not any ordinary winter, but a mile high Butte, Montana winter, so on the top of our endless "to do" list we decided to start at the top by replacing the old brittle and curled shingles before the snow flies. The damage to the plaster, both on the walls and ceilings, made it apparent the roof was leaking, for how long we don't know, but what is most certain, leaks never fix themselves and water is a home's worst enemy. We immediately requested bids for a new roof. Once again we were confronted with a jolt of financial reality when we received the contractors' bids. $22,000.00 was the low bid for a new roof. Although, I was initially shocked, to say the least, I came to realize the bids were fair, when one considers removing 41 squares of buried cedar shingles beneath the current 41 squares of dilapidated asphalt shingles (creating 82 squares of waste), and then sheathing the roof, a roof with 4 gables, 12 valleys, a 6/12 pitch, and not to mention hauling off those 82 squares of shingles. Ouch!! Be sure to thoroughly inspect the roof and potential expenditures prior to closing! I was ready to throw in the towel before I even got into the ring. I explained my roofing situation to my Bozeman neighbor, Mike, who, at the time, was between construction jobs in Bozeman. Mike said he would re-roof the house if I be his "gopher." Sounded great to me. We started as soon as possible, but during the tear-off we ran into some rotten bead boards in the soffit. We took the time to replace all the rotten boards, a wise choice since everything was easily accessible; thus the finishing time became a secondary issue, a job well done became our priority. A remarkable design aspect of the wide soffit on the east and west sides, as well as, on the gables is the exposed beams supporting them. Usually the soffits on these old Craftsman bungalows are sagging within 50 years, but these soffits, after 100 years, were still true relative to the main roof. As we began replacing the exposed bead boards on the soffit we discovered the exposed beams were not only for aesthetics, but were canter-levered into the main roof rafters giving the needed strength to support the weight of the extra wide soffits. Although these exposed beams appear to go through the external rafter (a through tenon), they do not. In this case, an authentic through tenon would have weakened the overall strength of the external rafter, therefore the external rafter was nailed to the ends of the exposed beams (shear strength), and short 3.5" sections of beam were toe-nailed onto the outside of the external rafter, giving the appearance of a through tenon. Since these short sections were exposed to the weather for 100 years they were rotten, so I did what I do best, I manufactured 50 plus end blocks, but rather than toe-nailing them into the external rafters, I drilled a 1/2" hole 3/4" deep in the center of the block, drilled a pilot hole through the block and screwed the block onto the external rafter with an 8" long , 1/4" log screw, then plugged/sanded/painted the 1/2" inch hole/block. This method of attaching the end blocks prevented water from entering (previous blocks rotted at the toe-nailed entrances), and since the 8" long screw went through the exposed block, external rafter and 4" into the external (canter-levered)beam, it gave the external rafter a renewed shear support to the supporting beam (good for another 100 years I would say). The first picture below shows the rotted block and its replacement, the second is a picture of the soffit above the front porch with its canter-levered support beams, external rafter, and attached blocks.
|
After removing all the layers of
shingles (the garage had five layers), we discovered the main part of the roof was covered with 7/8" X 6" douglas fir shiplap planks (no wide gaps between boards, and no rot). Technically, we didn't need to
sheath the roof, but we did with 7/16" OSB. We screwed the
sheathing through the shiplap and into the rafters, as well as, randomly
screwing it to the shiplap between the rafters thus creating a solid foundation for
the new shingles. All the rafters were solid and true. Knowing
winter was close at hand and with taking extra time to replace the rotten bead board, we decided to only strip the north half of the roof. This turned out to be a great idea. We decided to roll glacier guard, a self-adhering
sheet membrane usually used in the first five feet of a new roof, over the entire north side in case "old man winter" came before we finished, another great idea, we were on a "roll"
with great ideas. We even had a few sunny/warm days, Butte's short Indian
Summer, after the Glacier Guard was in place. The sun activated the membrane's adhesive and thus the Glacier Guard had sealed the roof's north side. Mike and
I were able to get the two north side gables shingled and about a quarter of
the way up the north side before we had to retreat due to icy conditions. Although
we didn't reach our goal, we felt confident the roof was "winterized"
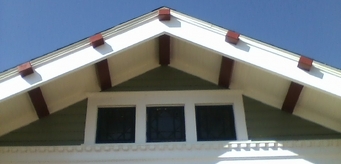
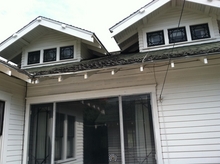
and we could finish the job in the spring. We were fortunate we didn't "bite off more than we could chew." Something to remember when facing a Butte winter. Mike and I got back together the following June to finish the roof. Everything went well, but we did keep an eye out for those fast moving, cloud bursting, thunder storms. Below are some before, during, and after pictures.
|
The above picture is of the north (back) side depicting how dilapidated the shingles were. This is also the area where the bead board under the soffit had to be replaced. Yes, there was a layer of cedar shingles under those dilapidated asphalt shingles.
|
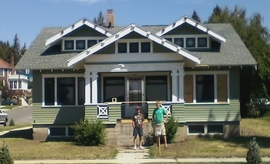
Here Mike and my son, Sean are on the south side during the hot part of June. By this time we mastered our technique and were making great strides toward completion. Both my sons, Sean and Fritz were busy painting the house green prior to Mike's arrival.
|
Mike and Sean with a job well done!!!
|
This concludes the roof restoration.
|
|
|